Home » Tag Archives: food

Tag Archives: food

Recipe: Crockpot Cilantro Lime Chicken

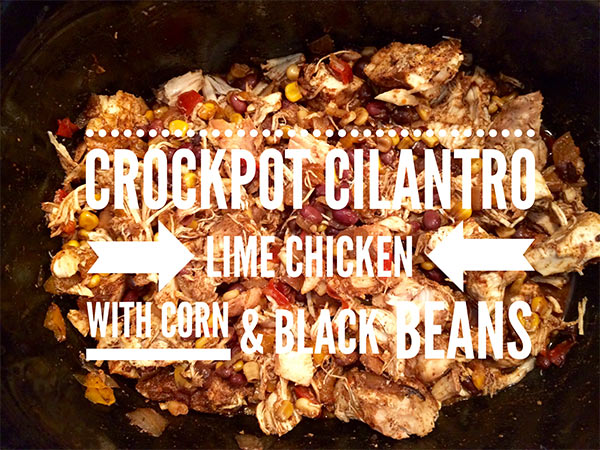
I’m always on the lookout for easy, healthy and delicious meals to add to my rotation and in the winter months that often involves my crockpot!

This was my first try with this cilantro chicken recipe, and it turned out awesome!

Cilantro Lime Chicken with Corn and Black Beans - Cooked!

Recipe Details:

Prep Time: 15 minutes
Crockpot Cooking Time: 6-8 hours on Low OR 5-6 hours on High
Serving Size: 1 cup
Serves 6-8

Cilantro Lime Chicken with Corn and Black Beans - Ingredients

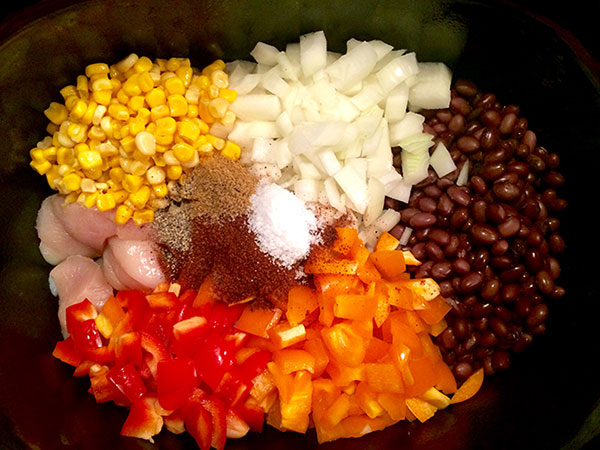
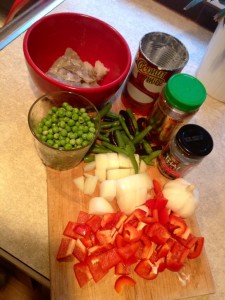
Shopping List / Ingredients: 

  • 2 pounds boneless skinless chicken, thighs or breast
    (I find that chicken thighs don’t dry out as much as the breast in the slow cooker)
  • 1 cup corn
  • 1, 15-ounce can black beans
  • 1 orange bell pepper, diced
  • 1 yellow bell pepper, diced
  • 1 onion, diced
  • Juice from 2 limes
  • 2 tablespoons chili powder
  • 1 teaspoon salt
  • 1 teaspoon cumin
  • 1/2 teaspoon black pepper
  • 1 teaspoon Siracha sauce (optional, if you like it spicy)
  • 2 tablespoons fresh chopped cilantro

Directions: 

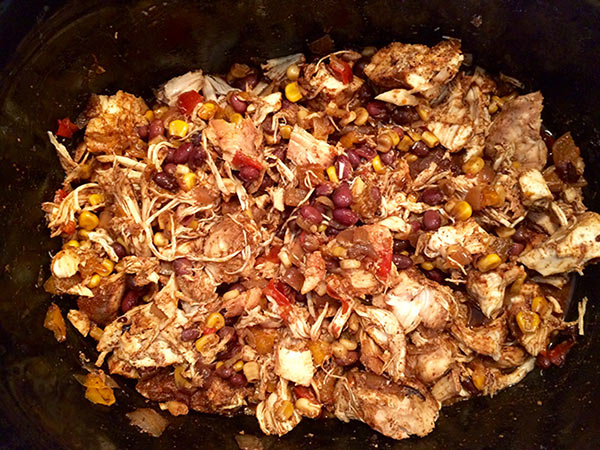
To eat it today: Combine all ingredients except cilantro in the slow cooker and cook it on low for 6-8 hours or on high for 5-6 hours.

To prepare for the freezer:  Chop up all the ingredients (except cilantro) and place them into a ziploc bag and freeze it for an easy meal option at a later date.

When you’re ready to cook it, take it out of the freezer, run warm water over the bag to separate it from the frozen food, and place frozen ingredients in the slow cooker. Cook on low for 6-8 hours or on high for 5-6 hours.

Cilantro Lime Chicken with Corn and Black Beans

How to Serve Cilantro Lime Chicken:  

Stir in 2 tablespoons fresh chopped cilantro before serving.

Add to tacos, burritos, taco salad, nachos, or make burrito bowls with it. Or just add it to your meals as a side dish. It’s very flexible.

In the photo below I’ve made huevos rancheros with my crockpot cilantro lime chicken for breakfast – DELICIOUS!

Cilantro Lime Chicken with Corn and Black Beans - Huevos Rancheros

Do you have a crockpot recipe to share? Post it in the comments below!

Recipe: Apple Butternut Squash Soup

I’m a HUGE soup lover, so I thought I would give this delicious looking apple butternut squash soup a try with the surplus of apples I picked from my parents’ trees. I had a fairly small butternut squash to work with, so I cut the recipe in half – an average squash should be fine with the full ingredient amounts.

Apple Butternut Squash Soup Recipe

Apple Butternut Squash Soup Recipe

Total Time: 1 hr.
Prep Time: 15 min.
Cooking Time: 50 min.
Equipment: Blender, large saucepan
Yield: 8 servings

Shopping List:

  • 4 lbs. butternut squash
  • 2 Tbsp. olive oil
  • 1 medium onion, chopped
  • 5 medium apples, peeled and chopped
    (Tip: Use the apples of your choice, a more sour apple will help reduce sweetness of the soup.)
  • 4 cups low-sodium organic chicken broth
  • 1 thin slice fresh ginger, peeled, finely chopped
    (Tip: I keep my ginger in the freezer, it helps it last longer and makes it super easy to cut into very thin slices.)
  • ¼ tsp. ground nutmeg
  • 1 cup nonfat milk
    (Tip: if you are lactose intolerant, use plant based milk instead.)
  • 1 tsp. sea salt
  • 1 tsp. ground white pepper
  • Optional: Cilantro to garnish

Directions:

  1. Preheat oven to 400° F.
  2. Cut butternut squash in half lengthwise and remove the seeds.
    Apple Butternut Squash Soup Recipe - Squash cut in half
  3. Cover squash halves with foil and place them on a baking pan cut sides up. Bake until tender (about 45-50 minutes). Set aside.
    Apple Butternut Squash Soup Recipe - foiled butternut squash
  4. While your squash is in the oven, add oil in large saucepan over medium-high heat.
  5. Add chopped onion; cook, stirring frequently until tender (maybe 3-4 minutes).
  6. Add apples, broth, ginger, and nutmeg and bring to a boil. Reduce heat to a simmer, stirring occasionally until apples are tender (about 10 minutes). Remove from heat.
  7. Pour the apple mixture into the blender (in batches, if necessary). Blend until smooth. Return apple mixture to saucepan.
    Apple Butternut Squash Soup Recipe - Blended apple mixture
  8. Take the squash out of the oven and scoop the flesh out into the blender, add milk (or almond milk in my case) and blend until smooth.
    Apple Butternut Squash Soup Recipe - baked squashApple Butternut Squash Soup Recipe - Blended squash
  9. Add blended squash to the apple mixture in the saucepan and add salt, and pepper. Bring to a gentle boil over low heat, stirring frequently.
  10. Remove from heat and serve. Garnish with fresh apple chunks and cilantro.

Apple Butternut Squash Soup

If you liked this apple butternut squash soup recipe, share the love with a pin, a like, a pic or a comment below!

Recipe: The Best Healthy Apple Crisp

I have to admit, I was a bit skeptical about this apple crisp recipe when I first read about it – mostly because there is no butter or no sugar in it. But I thought, “Hey! I have a TON of apples, so I may as well give it a shot.”

Well let me tell you, I am pleasantly surprised by what I pulled out of the oven last night! So here, as promised, is the recipe.

Apple Crisp - 21 Day Fix Approved

Healthy Apple Crisp

Recipe Details:

Prep Time: 28 minutes
Cooking Time: 30 minutes (approx.)
Serving Size: 1 cup

Shopping List: 

  • Your favourite apples (enough to make 4 cups, peeled and sliced)
  • 3 tbsp maple syrup
  • 1 tsp ground cinnamon
  • 1/4 cup old fashioned rolled oats
  • 1/4 finely chopped (or crushed up) pecans and/or walnuts

Directions:

  1. Pre-heat the oven to 375F.
  2. Peel and slice up 4 cups of apples.
    (I had a leftover peach that needed to be used up, so those are the orange bits you see in the photo below.)
  3. In a medium baking dish; combine the apples with 2 tbsp maple syrup and 1/2 tsp cinnamon and mix well.
    Apple Crisp Recipe - 21 Day Fix Approved
  4. In a bowl, combine oats, nuts, 1 tbsp maple syrup, 1/2 tsp cinnamon and mix well.Apple Crisp Recipe - 21 Day Fix Approved
  5. Top the apple mixture with the oat mixture in the baking dish.
    Apple Crisp Recipe - 21 Day Fix Approved
  6. Bake 25-30 minutes or until the apples are soft.
  7. Clean up. There’s not a whole lot of mess…

Cleanup from apple crisp recipe

Enjoy your fresh, delicious, 21 Day Fix approved apple crisp with a cup of tea or coffee! (In the photo: Earl Grey de la Creme black tea from Steeped Tea With Jenn)

Apple Crisp with Earl Grey del la Creme Tea

Bonus Vanilla Shake Recipe

Apple Pie Shakeology Recipe
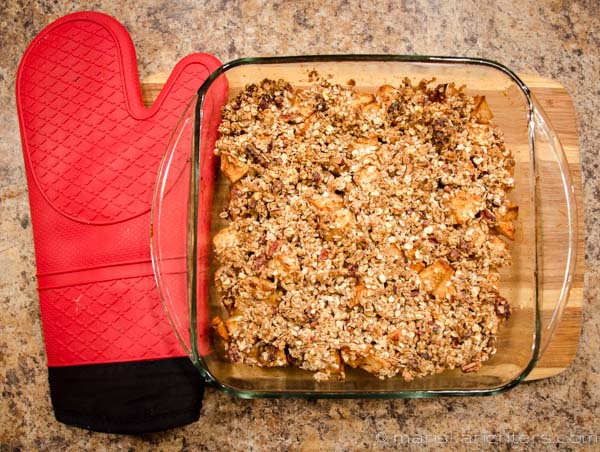
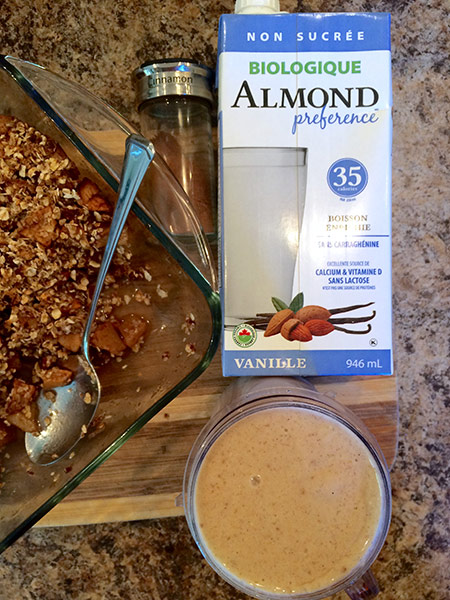
This morning, as I was making Adam’s vanilla shake, I wondered how good it might be with some of the apple crisp blended into it.

Um, Hello Apple Pie with Vanilla Ice Cream!

Apple Pie Shake Recipe:

Blend together:

  • 1/2 cup apple crisp
  • 1/2 tsp cinnamon
  • 1 scoop your favorite Vanilla Shake Powder
  • 1 cup almond milk (unsweetened)
  • Ice (optional)

Did you like this recipe? Share the love with a pin, a like, a pic or a comment below!

5-Day FREE Clean Eating Challenge – Starts September 19

Announcing my F R E E Clean Eating Challenge, starting Sept 19!

After a summer of patio and BBQ spoils, I’m sure we all have a little maintenance to do on our eating habits. I know I do! So I’m hosting another 5-day clean eating challenge to help you get back on track.

Free Clean Eating Challenge, Starts September 19


This 5-Day Clean Eating Challenge Includes:

  • The Basics of Clean Eating
  • Free Meal Plan
  • Free Clean Grocery List
  • Free eBook of Clean & Delicious Recipes
  • Daily (optional) Mini Workout Challenge
  • Provide Support & Accountability
  • FUN & RESULTS!

Results From My Last Clean Eating Challenge Group:

  • “I feel great! I’ve lost weight, my clothes are feeling looser and I’m not craving not-so-clean foods.”

  • “So encouraging how the results show up so quickly!”

  • “This group has really motivated me to be more mindful and realize how great I feel when I am eating clean!”

It all starts on September 19th! Comment “I’m in!” below or message me if you want to join!

10 Reasons Why You Should Eat More Avocado

Avocado has got to be one of my favorite fruits. I include it in my meals nearly everyday. I put it on salads, in smoothies, spread it on toast, put it on sandwiches, add it to wraps, or just eat it right out of the skin with a spoon!

But not only is avocado delicious, it’s also very good for you. If you don’t already include avocado in your regular diet, this list of health benefits might convince you to start adding it to your regular menu.

Why You Should Eat More Avocado

10 Reasons Why You Should Eat More Avocado:

  1.  Avocado Can Lower Cholesterol – The oleic acid in avocados helps to reduce cholesterol levels.
  2. Avocados are Loaded With Antioxidants – Antioxidants help prevent disease and have even been touted to help against cancer and Alzheimer disease.
  3. Eating Avocados May Help You Lose Weight – Avocado has been known to be a hunger-squasher – the fiber and healthy fats make you feel fuller for longer.
  4. Avocados Provide Healthy Fats – Not all fat is bad for you. Avocados are packed with monounsaturated fat, which it where you get most of your calories from the avocado. Monounsaturated fat helps lessen you LDL cholesterol, which is harmful to your body.
  5. Avocados Are Good For Your Heart – Avocados help with the absorption of carotenoids (beta-carotene and lycopene), which are essential for heart health. They are virtually the only fruit that contains monounsaturated fat, making them a heart-healthy diet choice.
  6. Avocados Are Packed With Vitamins – You will find vitamins B, K and E in avocados. Vitamin B helps you maintain a healthy skin tone and metabolism, vitamin K is instrumental in bone growth and density, while vitamin E is key for strong immunity and healthy skin and eyes.
  7. Avocados Are High in Fiber – Avocados provide 37% of the daily recommended amount of fiber. They contain both soluble and insoluble fiber. Soluble fiber helps you with appetite control by making you feel full, while insoluble fiber is great for cleaning out you bowels.avocado selection
  8. Avocados Are Great During Pregnancy – On top of all the other benefits of avocados, they have been known to help with morning sickness and also help your baby’s brain and tissues grow. Plus, if you’re having trouble gaining weight during pregnancy, they are a great food to load up on thanks to the healthy fats.
  9. Avocados Are Potassium Rich – Avocados contain more potassium than bananas! Potassium helps lower blood pressure and is something that most people don’t get enough of in their diets, putting them at risk of stroke and heart problems.
  10. Avocados are DELICIOUS! – Seriously! If none of the above convinced you to add more avocados to your diet, maybe the deliciousness will! They are rich and fresh and squishy in your mouth and fit in with almost any meal.

How To Choose the Right Avocado

Avocados only ripen after they have been picked, this is why you will find that most stores and markets will have mostly hard, green avocados available in their produce section.

Because of this, you will most likely not be eating your avocado on the day you bring it home from the store. Leave it on the counter at room temperature (not in the fridge) until it ripens. You’ll know it’s ripe by the color – it will change to dark green, almost black – and becomes soft when you gently squeeze it. One trick that has been known to help an avocado ripen faster is to put it in a paper bag with a banana and place it in a dark cupboard. Try it and let me know how it goes in the comments.

 What’s your favorite way to eat more avocado?

11 Health Benefits of Coconut Water

Coconut oil has become all the rage these days. There are so many benefits and uses for this natural oil, some of which I will cover in a future post. Today I’m going to focus on another wonderful nectar that this delicious fruit provides: Coconut Water!

I first discovered coconut water while traveling in Bali a few of years ago, and then I rediscovered it in Costa Rica last fall. Toward the end of my trip, I would hunt down “Señor Coconut” on the beach to indulge in this delicious nectar on a daily basis. My favourite time to drink it would be after my morning beach workout as a reward for my hard work.

What I didn’t know then was that coconut water has many benefits beyond its refreshing deliciousness!

Fresh Bali Coconut

My very first fresh coconut in Bali. This man climbed the tree to pick it for me, lobbed the top off and handed it to me with a straw. So delicious!

11 Health Benefits of Coconut Water

  1. Hydration – Coconut water is rich in potassium and natural sugars that your body needs to rehydrate after rigorous exercise.  Sport drinks only carry half the amount of potassium and twice the amount of sugar compared to coconut water. So stop buying sport drinks and try this natural and more effective (and healthier!) alternative.
  2. Energy Booster – Rich in essential nutrients, coconut water makes a wonderful energy drink. Coconut water has less sugar and sodium content than energy drinks, and a high content of calcium, magnesium, phosphorous, and potassium which helps hydrate and rejuvenate the body.
  3. Hangover Remedy – Thanks to it’s hydration properties, coconut water is a great remedy if you had one too many the night before. It also helps settle your stomach and replaces essential electrolytes for those extra rough hangovers that result in vomiting and dehydration. So before you reach for that caesar or redeye, give your body a break and start with a glass of coconut water!
    Me and My Coconut
  4. Muscle Cramps – You know how they say you should eat bananas to avoid cramps? Well if you’re not a banana fan, this is a perfect alternative. The high potassium content in coconut water helps to reduce muscle cramps caused by potassium deficiency.
  5. Weight Loss – Regular consumption of coconut water increases the metabolism rate which helps burn sugar much faster. As a result, the level of insulin in the body burns faster, causing more energy and fat burning. It also helps you feel full and reduces cravings.
  6. Stronger Bones – Coconut water is high in calcium, which we all need for stronger, healthier bones, muscles and tissue.
  7. Regulates Blood Pressure – It helps improve blood circulation, lowers blood pressure and reduces the chances of a heart attack or other cardio problems. Drink up!
  8. Skin Benefits – If you have problem skin, or you simply want to retain your skin’s youthfulness (who doesn’t?), apply coconut water on your face and leave it on overnight. Coconut water has shown to be effective against acne and acts as a toner for the skin. It also moisturizes your skin from within if you drink it regularly.
  9. Hair Conditioner – You know all those hair products that contain coconut oils and extracts? Well it’s not just to make it smell nice! It actually conditions the hair from within by penetrating the hair shaft. You can get these benefits by either consuming coconut water, or by washing your hair with it. It also promotes hair growth by protecting the scalp against dandruff, lice and itchy scalp, all of which can impede hair growth. And an added bonus: it gives your hair a beautiful healthy shine!
    coconut palm tree
  10. During Pregnancy – Doctors often recommend coconut water during pregnancy to help fight constipation, heart burn and slow digestion.  It helps to improve immunity and boosts the levels of amniotic fluid and improves the overall health of the foetus (and the mother).
  11. All Natural – The BEST part about coconut water is that it’s ALL NATURAL! There are no added artificial sugars, preservatives, colouring or other chemical ingredients that you want to avoid.

This is just a short list of the many benefits of this delicious natural nectar. Do your body a favour and try some coconut water today! You can drink it straight up or add it to a shake or smoothie. However you decide to ingest it, get it in ya!

Where to Buy Coconut Water

If you’re lucky enough to be living your dream (and mine) in the tropics, you will likely find a plethora of fresh coconut vendors around. If you are living your dream in a cooler, non-tropical place, bottled coconut water is available in most grocery stores and you can even have it delivered to your door by ordering online from Amazon. Many yoga studios stock it because of its health benefits and some gyms do as well. You may never have noticed it before, but it’s everywhere. Drink Up and Enjoy!

Do you drink coconut water? What benefits are you seeing? Please share in the comments below.


How To Make a Costa Rican Michelada

Costa Rican Michelada

When traveling to new places, I always make sure that I try the local beers and cocktails. In Russia it was vodka, in Bali it was Arak liquor, in Belize it was 1 Barrell Rum (mmm, tastes like maple syrup), and in Costa Rica it was the Costa Rican michelada!

I was introduced to the Costa Rican Michelada (as opposed to the Mexican michelada) during my stay in Tamarindo. I was a little skeptical at first (seriously, ICE and SALT in BEER???) but WOW was it ever refreshing! It’s a must-try if you’re in Costa Rica.

Ingredients:

Serves: 1

  • Sea salt
  • Ice
  • 1 Fresh Lime (or lime juice from concentrate, but fresh is always better)
  • 1 bottle of Imperial or Imperial Light beer (I prefer Imperial Light)

    Note: If you’re making this at home and you don’t have access to Imperial, you can make a “Mexi-Rican” variation using Corona.

[Tweet “Make yourself this refreshing Costa Rican Michelada tonight! #beer #lime #yum”]

  1. Use a slice of lime and to moisten the edge of the glass with lime juice
  2. Dip the glass in sea salt to rim the edge with salt (same way you would for a caesar)
  3. Fill the glass halfway with ice
  4. Squeeze the entire lime into the glass
  5. Serve with a full bottle of Imperial Light to be poured in at the drinker’s pace
  6. Sit, relax, enjoy and (if you’re not near a beach) watch this:

What cocktails ave you discovered while traveling?

Did you love your Costa Rican Michelada? Then like it and share it with the social buttons below.

Easy Thai Curry – Plus Bonus Leftover Recipe

One of my all-time favourite meals is Thai curry, mmm! 

I took these photos back in October and have been meaning to share this deliciousness since before I left Vancouver. I think it’s about time! This recipe is easy to make and you can use pretty much any vegetables you have in your fridge. I’ve made this with chicken and prawns, but you can use whatever type of meat you like.

Prep time: 15 minutes
Total cooking time: 45 minutes
Serves: 2

Ingredients:

Thai Curry Ingredients

  • 1 tablespoon coconut oil
  • 1 tablespoon of curry paste
    (I prefer red curry, but green or yellow is delicious too)
  • 1 can of coconut milk (400ml)
    (Note: I’ve found that organic coconut milk is less expensive than the regular one in Canadian grocery stores. )
  • 1 stalk of lemongrass
    (tie it in a knot to avoid it falling apart while cooking)
  • 2 kefir lime leaves
  • 1/2 cup of chicken stock
  • 1 tablespoon of brown sugar
  • 1 tablespoon of fish sauce
  • 2 cups of assorted chopped vegetables
    (I usually use garlic, onion, red pepper, carrots  and potatoes, plus any other veggies I have in the fridge.)
  • 1 lb of meat – prawns, chicken, beef, pork, whatever – cut into bite-sized pieces
  • 2 tablespoons fresh basil, chopped (optional)
  • Sambal oelek – hot sauce (optional)

Directions:Thail Curry Simmering

  1. Put the coconut oil into a skillet or saucepan on medium heat. Add the curry paste and stirfry that for about 2 minutes.
    (Note: Curry’s flavours are released through heat, so be sure not to skip or rush this step.)
  2. Add the coconut milk, chicken stock, lemongrass and kefir lime leaves and bring to a boil, reduce heat and simmer for 10 minutes.
  3. Stir in the brown sugar until it dissolves.
  4. Stir in the meat and vegetables, cover and simmer for 30 minutes.
    (Note: If using prawns, add vegetables first and add the prawns halfway through. Prawns don’t take long to cook and you want to avoid that rubbery texture from over-cooking.)
  5. Stir in the basil, if you have it and serve!

I like to eat it as a soup, but it can also be served over rice.
If you like a bit more heat to your curry, add a dash of sambal oelek to your bowl.

Oh SO delicious! Enjoy!

Bonus Leftover Recipe!

If you have leftovers, I have a super easy, quick and tasty breakfast recipe for the next morning.

  1. Reheat the leftovers in a skillet
  2. Crack a couple of eggs into a bowl, beat lightly to break the yolks and add them to the skillet.
  3. Stir / scramble until the egg is fully cooked.
  4. Serve in a bowl or on a plate with toast and fresh fruit.

Nomnomnom!

Quails’ Gate Winery

Last weekend I took a little road trip to Kelowna in BC’s Okanagan to support my friends as they competed in the Ironman Challenge in Penticton. I took this opportunity to do a wine tour at Quails Gate Estate Winery (cuz it’s wrong to visit the Okanagan in the summer without stopping in at at least one winery…)

I headed to the winery with my friend Bruce around lunch time. I had heard that their food was incredible and their patio was amazing, so I wanted to see for myself.

QuailsGate-1
We started with the Wild Coast Mussels and Clams (shallots, garlic, parsley, tomato broth, grilled crostini), and then I moved on to the delicious Albacore Tuna “Tartine” (confit tomato, egg, potato salad, pickles & olive house made focaccia, anchovy vinaigrette), and Bruce had the Yarrow Meadows Duck Leg Confit (quinoa and cabbage salad, sprouted beans, carrot, cilantro, cucumber, mirin dressing). We paired our meals with a bottle of the 2012 Chenin Blanc, and it was a party in my mouth! See more of the menu here.

Mussels at Quails Gate Winery    Tuna Tartine at Quails Gate Winery


After lunch we took a walk around the vineyard and took a little afternoon break to take in this gorgeous view:

Mariska at Quails Gate Winery

QuailsGate-13QuailsGate-9

From there (after dreaming of never leaving), we headed into the tasting room and tasted their delicious wines. Having had the Chinin Blanc with lunch, we tasted the Dry Riesling, the Rose, and the Quails’ Gate Old Vines Foch. I have to say that I enjoyed the whites and the rose more than the red, but all were excellent!

QuailsGate-16

Then, of course, we couldn’t leave without doing a little shopping! (I might have left with half a dozen bottles of fermented goodness…)

If you’re a lover of food and you appreciate good wine, I would highly recommend visiting the Quails’ Gate Estate Winery in Kelowna. I can’t wait to get back to the Okanagan to sample some of the other wonderful wineries! Who’s coming with me?? : )

Which Okanagan wineries have you visited? Please share your experience and recommendations in the comments below.

Island Time

Vancouver Island time 9Vancouver Island time 1Vancouver Island time 2Vancouver Island time 3Vancouver Island time 4Vancouver Island time 5
Vancouver Island time 6Vancouver Island time 7Vancouver Island time 8Vancouver Island time 10Vancouver Island time 11Vancouver Island time 12
Vancouver Island time 13Vancouver Island time 14Vancouver Island time 15Salmon ready for the BBQSalmon ready for the BBQFresh salmon on the BBQ
Fresh BBQ'd salmon, potatoes and asparagus for dinner! YUM!

Island Time 2011, a set on Flickr.

A collection of photos of my visits to Vancouver Island in 2011.