In the past couple of weeks I’ve shared some photography tips with you relating to camera setup and shoot planning, as well as exposure and camera settings. Today I’ll be covering 10 focusing and sharpness tips to help improve your photography even more.
Get Tack Sharp Images – 10 Focusing and Sharpness Tips
 Hold the Camera Properly – Hold your elbows close to your body and hold your left hand under the lens. Release the shutter just after you exhale to help hold the camera steady and minimize camera shake.
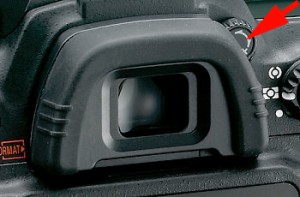
- Focus Your Viewfinder – Most DSLR cameras enable you to adjust your viewfinder for your personal eyesight using the dioptre adjustment dial. Make sure you adjust this to ensure you can see your subjects clearly through your viewfinder.
- Set the Right Focus Point – Set your camera to single-point AF mode, rather than letting the camera choose the focus point automatically. You can then position the active point on the subject that you want to be sharp. This is very useful when the main subject is not right in the centre of the frame.
- Use Focus Lock – Use this when your subject is not right in the middle of your frame. Position the subject in the middle, focus on it, use the focus lock and then re-frame the shot.
- Pre-Focus – If you have a moving subject and can predict where it is going to be, pre-focus on that spot to make capturing a great action shot easier.
[Tweet “Take sharper photos – 10 Focusing and Sharpness Tips. #Photography”] - Shallow Depth of Field – A shallow depth of field (or wide aperture) to blur the background can make your subject appear sharper than when your whole photo is sharp. However, you should avoid using very small apertures unless you absolutely have to because lenses produce softer results at f/22 than at f/8.
- Hyperfocal Focusing – To get the full scene sharp with a wide angle lens, you should focus around one third of the way into the scene with an aperture of f/16.
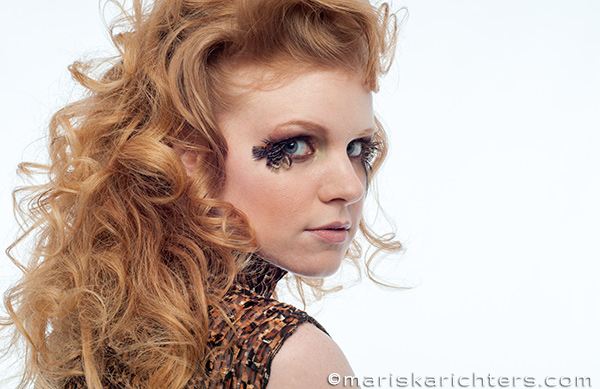
- Focus on Eyes – The eyes are usually the most important feature of a portrait, so make sure you focus on eyes of your subject. This is especially important if you’re shooting with a shallow depth of field and wide aperture.
 Use a Tripod – This is the best way to ensure sharp images, especially when shooting at long shutter speeds. A monopod may be a better option for action shots to minimize camera shake but still move around fairly easily. If you don’t have a tripod or monopod, brace the camera on a solid object like a post or a wall. When all else fails you can kneel or lie down to create a more stable position.
- Use a Remote – For long exposures, mount your camera on a tripod and then use a remote shutter release or the self timer to avoid camera shake when you press the shutter release button. (I use the Nikon ML-L3)
What focusing tricks do you use to get super sharp images? Please share in the comments.
Stay tuned next week for lighting and colour tips.
If you found this article useful, please share it with your friends via the social media buttons below.