Home » Tag Archives: Photography

Tag Archives: Photography

Day Trip: China Beach, Vancouver Island

As with all the beaches in this part of the world, China Beach, Vancouver Island has it’s own features and characteristics that make it an easy favourite for many. I have a pretty long shortlist of the best beaches on Vancouver Island, and China Beach is one of them.

China Beach on Vancouver Island

How to Get to China Beach

China Beach falls approximately at the midway point of the Juan de Fuca Marine Trail between Jordan River and Port Renfrew on BC Highway 14. You’ll see signage for a campground and a little ways past that, you’ll see the day use parking lot entrance. The beach is about a 10 minute walk from parking lot on a clear and easy walking path.

Three Things I Love About China Beach

  1. The Sand!
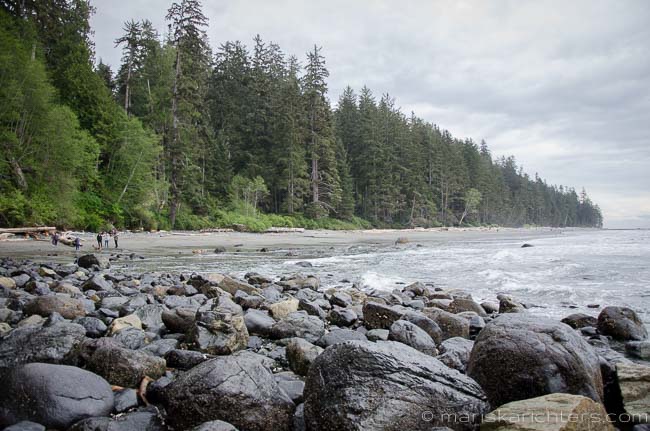
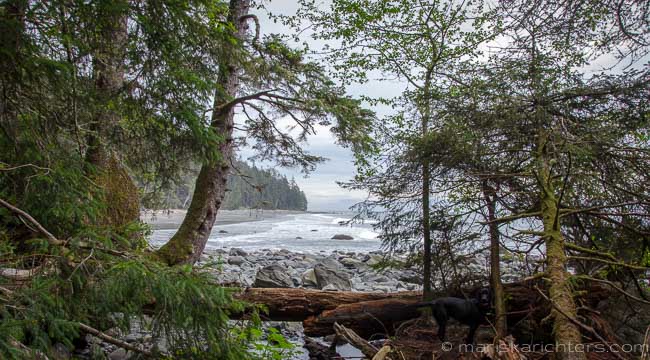
    China Beach is a gorgeous long sandy beach with large rocks at either end. The sand is soft and clean with very few shells or rocks to hurt your feet on when walking barefoot. It’s a great place for kids to build sandcastles while parents enjoy a picnic basket and an adult beverage.
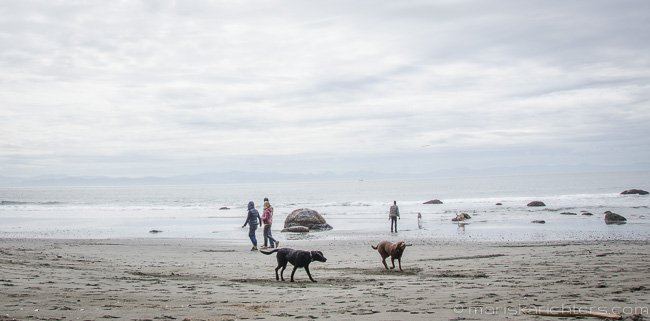
The Sand - China Beach on Vancouver Island
  2. The Waterfall!
    If you hike over the rocks on the west side of the beach at low tide between fall and spring, you’ll find a river flowing out into the ocean. If you follow the stream up, you will come to a beautiful waterfall flowing over the rocks into a small pool that could be used as a swimming hole on warmer days.
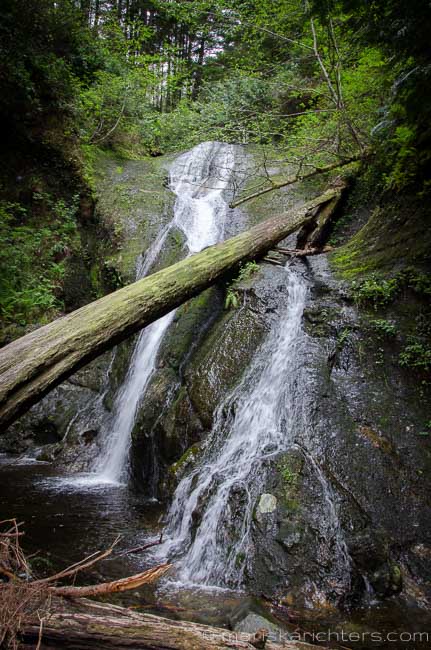
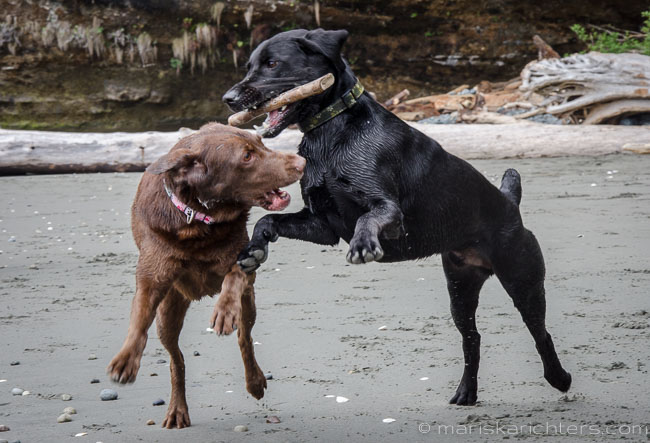
The Waterfall at China Beach on Vancouver Island
  3. It’s Dog Friendly!
    We usually bring two of our three dogs with us on our day trip adventures and China beach was no exception. I love that the beach is dog friendly and the dogs had such an incredible time digging holes, chasing sticks and playing in the water.Dogs playing at China Beach on Vancouver Island Dogs playing at China Beach on Vancouver Island

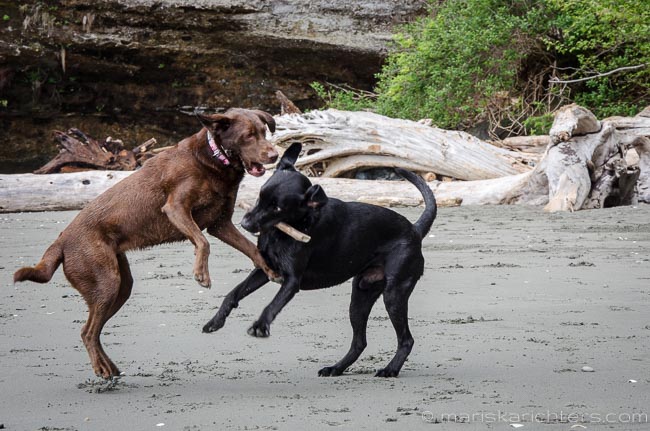
 Tips For A Day Trip To China Beach

There are a few things to keep in mind when visiting any beach along Vancouver Island’s west coast:

  1. Do not leave valuables in your vehicle. Thieves are active in the area and are not shy to break into cars. Be sure to take your valuables with you and to securely lock your vehicle.
  2. Protect yourself from the sun. Always wear sunscreen and a hat. Even on cool cloudy days, the sun can still treat you to a burn. Everyone hates dealing with a sunburn. Be sun smart!
  3. Respect the wildlife. Vancouver Island’s west coast is home to all kinds of wildlife, including deer, bears, cougars, wolves and raccoons. Be aware of your surroundings and if you happen to come across any local wildlife, do NOT feed it, do not approach it, and give it lots of space. Animals become dangerous if they feel cornered or if they have young with them. Steer clear, even if it means that you need to leave the beach for your and your family’s safety. We sometimes attach bear bells to our dogs’ collars to help alert any wildlife of our presence.
  4. Pack it in, pack it out. If you pack food down to the beach, please be sure you pack out ALL of your garbage (even the compostables) and dispose of it responsibly. Don’t be a litterbug. Please keep our parks and beaches clean.
  5. Bring a camera! The views and the waterfall at China Beach provide beautiful photo ops. We all have our camera phones with us these days, but it’s well worth the effort to carry your DSLR camera with you, you may even be lucky enough to see whales just off the beach!
View more photos of China Beach, Vancouver Island

China Beach on Vancouver Island

Have you visited China Beach on Vancouver Island?

Please share your favourite part in the comments below.

How to Shoot Slo-Mo Video With Your iPhone

A little while back I started playing with the new iOS8 slo-mo feature on my iPhone camera and I have been very entertained by the results. (Demo videos in this post were shot with an iPhone 5s running iOS8.)

Of course one of my first videos had to be of my chocolate lab, Roxie. I laughed when the slo-mo recording made her sound like a vicious lion!

Slo-Mo Video Demo – Barking Dog

How to Shoot Slo-Mo Video With Your iPhone

  1. Make sure you have iOS8 installed on your iPhone. If you don’t, go ahead and do the update. (If you’ve been nervous about updating your iPhone 5s, don’t be – mine works just fine.)
  2. Slo-Mo Feature iPhone IOS8Open your iPhone’s camera. It will likely be set to ‘Photo’ mode.
  3. Swipe your finger to the right until you get to the Slo-Mo setting. You will notice that the camera hasiOS8 Slo-Mo Editing on iPhone zoomed in a bit in video mode so you may need to reposition yourself to get everything you want in the frame.
  4. Tap the red record button to begin recording and tap it again to stop recording when you’re finished capturing your video.
  5. Now it’s time to edit! Go to playback mode and select your video.
  6. You will noticed two scrubbing markers on either side of the playback bar. You can adjust these to where you want the slow motion to begin and end. To preview your edits, tap the play button.
  7. When you’re happy with your slo-mo edits, tap save.
  8. You can now upload your slo-mo video to YouTube, Facebook or your preferred sharing sites to share your video with the world!

Slo-Mo Video Demo – Walking in fallen leaves

Every fall I LOVE kicking around in the fallen leaves, so I thought this would make a fun slo-mo video demo. Compared to last year’s leaf kicking video, this one is much more fun!

Have you shot any fun slo-mo videos with the new iOS8 slo-mo feature? Please share the links in the comments.

Photography: 10 Composition and Creativity Tips

I’ve shared a whole schwack of photo tips over the past several weeks:

Now that we’ve covered the technical aspects, we will be getting into the fun part with some composition and creativity tips.

In photography, composition and creativity can be about following the rules or breaking them. It’s all about experimenting and trial and error. There is no wrong answer when it comes to being creative, so get out there and start shooting to see where your eye takes you.

10 Composition and Creativity Tips

  1. Create a Project For Yourself – Coming up with shooting ideas can be tough sometimes when you’re running low on inspiration. To get around this, set yourself a project so that you have a focus. If you’re feeling particularly inspired one day, create a list of mini projects and write them on small pieces of paper. Drop them into a jar and pull one out every time you need some inspiration. Check out this article to get yourself started.
  2. Simplicity – Some of the greatest photo compositions are not about what’s in the image, but rather about what has been left out. Look through your viewfinder to see if there is anything you can remove that doesn’t add to your image and adjust your shot to crop it out.
  3. Straight Horizon – Make sure your horizon is level. There’s nothing worse than capturing a great shot but then finding out later that your horizon is totally crooked, sometimes rendering your image unusable.
  4. Rule of Thirds – The rule of thirds states than an image is most pleasing when its subjects or regions are composed along imaginary lines which divide the image into thirds — both vertically and horizontally. Position the important elements in your scene along those lines, or at the points where they meet. You can also apply the rule of thirds to existing photos by cropping them later. You’ll find more information on the rule of thirds here.Photography: Rule of Thirds
  5. Fill the Frame – Filling up the frame forces you to keep your background simple and clean. Getting in closer to your subject eliminates distracting elements and cluttered backgrounds that detract from your image. Use a wide aperture to render your background slightly out of focus to make the viewer focus directly on the foreground and subject being presented.
  6. Look For Reflections – Reflections in water or in glass can add symmetry to your image. You can also try to shoot reflections in isolation for more abstract compositions.
    Ucluelet Boat Reflections
  7. Try a Low Viewpoint – Get a more creative view by shooting from ground level for a different perspective on common subjects. For portraits of animals or children, get down to their eye level for a more intimate image.
  8. Try a Panoramic Image – I’m a big fan of the long thin panoramic images. They can add impact to your landscape shots. You don’t need to worry about stitching images together however, you can just take your high resolution image into your image editing software and crop it for the same effect.
    Vancouver - False Creek Panorama
  9. Shoot in Odd Numbers – Odd numbers give a more balanced composition than even numbers. Try to arrange your shot with an odd number of elements.
  10. Break The Rules!!! – The rules of composition can be helpful when you’re finding your eye and your vision, but they can also be a bit restricting. Once you have the rules down pat, get creative and start breaking them. For example, try putting the horizon at the top or bottom of the frame.

There are many more composition rules and ideas out there, but these should get you started.

Bonus Tip: Try shooting a picture everyday to get yourself into the habit of finding great photographic opportunities. We all have our smartphones with us all the time these days, so use your phone’s camera if you don’t want to lug your DSLR around with you everywhere. Post your daily pics to Instagram and see what people like. This is a great tool to find out what people find aesthetically pleasing. Share your Instagram profile link below so we can follow along and weigh in too!

Do you have any composition tips or tricks to add? Share them in the comments.

Photography: 10 Lighting and Colour Tips

In the past few weeks we have covered camera setup and shoot planningexposure and camera settings, and focusing and sharpness. Today I’ll be sharing some lighting and colour tips to help advance your photography skills even further.

10 Lighting and Colour Tips

  1. Take Advantage of Cloudy Days – You don’t need to wait for a sunny day to go out and shoot. Cloudy days are great for portraits, macro and even some landscape situations. The cloud provide a natural diffuser to the sun’s bright light and help eliminate harsh shadows.
  2. Shoot Into the Light – Don’t always shoot with the sun behind you. Experiment with shooting into the light for some interesting images. Try to position the sun (or light source) behind your subject to help minimize flare.
    Lynn Canyon, Vancouver, Canada - © 2011 Mariska Richters Photography

    Lynn Canyon, Vancouver, Canada – © 2011 Mariska Richters

  3. Shoot at the Golden Hour – The golden hour is one of my favourite times of day for shooting. The golden hour is the period shortly after sunrise or before sunset during which daylight is redder and softer compared to when the sun is higher in the sky. At these times the light is much warmer and you will get much better colour. You will also get some interesting shadows and textures.
  4. Use a Reflector – A reflector can help you fill in shadows by bouncing light back into the darker areas of your image. If you don’t have a proper reflector, you can use anything from a white piece of paper or poster board to a sheet of fabric like a t-shirt.
  5. Experiment With Fill-In Flash – Use your camera’s built-in or external flash to lighten shadows when the sunlight causes dark shadows on your subject.
    [Tweet “Improve your photography with these Lighting and Colour Tips. #photography #PhotoTips”]
  6. Use a Diffuser – The sun can produce some pretty harsh shadows when it’s high in the sky. Experiment with placing a diffuser between the light and the subject to soften shadows.You don’t have to spend big money on an expensive light diffuser, you can easily make one yourself out of a piece of white cloth or paper.
  7. Shoot at Night – Night photography is where I’ve produced some of my favourite images. Experiment using long exposures and other lighting techniques like light trails and painting with light. Be sure to bring a sturdy tripod and remote shutter release to help capture sharp images.
    Granville Street, Vancouver, Canada

    Granville Street, Vancouver, Canada – © 2010 Mariska Richters

  8. Play With Your White Balance – It’s easy to set your camera to automatic white balance, but the auto setting can be fooled in lighting some situations. If you’re shooting in a mixed lighting setting, try shooting a white or grey card and use this to help you learn about and set your custom white balance. Remember that as long as you are shooting in raw file format, you can always adjust the white balance with your software in post-production later.
  9. Shoot at Twilight – Just  before sunrise and just after sunset are great for capturing some moody landscape images. It’s also a good time to catch street scenes and cityscapes while the sky has a bit of light yet you still capture the city lights.
  10. Try Shooting In Black and White – I’ve found that I don’t shoot much black and white since the emergence of digital photography. It was far easier to do when you used a roll of black and white film in your camera. But harsh sunlight can produce strong shadows for some interesting high-contrast back and white images. Try it!

Do you have any colour or lighting tricks to add? Share them in the comments below.

Next week I’ll share Composition and Creativity Tips.

If you found this article useful, please share it with your friends via the social media buttons below.

Photography: 10 Focusing and Sharpness Tips

In the past couple of weeks I’ve shared some photography tips with you relating to camera setup and shoot planning, as well as exposure and camera settings. Today I’ll be covering 10 focusing and sharpness tips to help improve your photography even more.

 Get Tack Sharp Images – 10 Focusing and Sharpness Tips

  1. Nikon DioptreHold the Camera Properly – Hold your elbows close to your body and hold your left hand under the lens. Release the shutter just after you exhale to help hold the camera steady and minimize camera shake.
  2. Focus Your Viewfinder – Most DSLR cameras enable you to adjust your viewfinder for your personal eyesight using the dioptre adjustment dial. Make sure you adjust this to ensure you can see your subjects clearly through your viewfinder.
  3. Set the Right Focus Point – Set your camera to single-point AF mode, rather than letting the camera choose the focus point automatically. You can then position the active point on the subject that you want to be sharp. This is very useful when the main subject is not right in the centre of the frame.
  4. Use Focus Lock – Use this when your subject is not right in the middle of your frame. Position the subject in the middle, focus on it, use the focus lock and then re-frame the shot.
  5. Pre-Focus – If you have a moving subject and can predict where it is going to be, pre-focus on that spot to make capturing a great action shot easier.
    [Tweet “Take sharper photos – 10 Focusing and Sharpness Tips. #Photography”]
  6. Shallow Depth of Field – A shallow depth of field (or wide aperture) to blur the background can make your subject appear sharper than when your whole photo is sharp. However, you should avoid using very small apertures unless you absolutely have to because lenses produce softer results at f/22 than at f/8.
  7. Hyperfocal Focusing – To get the full scene sharp with a wide angle lens, you should focus around one third of the way into the scene with an aperture of f/16.
    Studio-Portrait---Focus-on-the-Eyes
  8. Focus on Eyes – The eyes are usually the most important feature of a portrait, so make sure you focus on eyes of your subject. This is especially important if you’re shooting with a shallow depth of field and wide aperture.
  9. Nikon ML-L3 RemoteUse a Tripod – This is the best way to ensure sharp images, especially when shooting at long shutter speeds. A monopod may be a better option for action shots to minimize camera shake but still move around fairly easily. If you don’t have a tripod or monopod, brace the camera on a solid object like a post or a wall. When all else fails you can kneel or lie down to create a more stable position.
  10. Use a Remote – For long exposures, mount your camera on a tripod and then use a remote shutter release or the self timer to avoid camera shake when you press the shutter release button. (I use the Nikon ML-L3)

What focusing tricks do you use to get super sharp images? Please share in the comments.

Stay tuned next week for lighting and colour tips.

If you found this article useful, please share it with your friends via the social media buttons below.

Photography: 10 Camera Set-Up and Planning Tips

Summer presents us with some great photography opportunities with more light, longer days and clear summer skies. So with that in mind, I’m sharing some camera set-up and planning tips to help improve your photography skills not only for summer, but year round.

  1. Set your camera’s date, time and filename – Setting the date and time will help you organize your photos later when editing and will make them easier to find down the road if you’re looking for a particular photo. Set the filename to something you will find easily and can identify as your own images. I use my initials.
  2. Turn off camera sounds – Turning off the camera beeps makes shooting less intrusive. When shooting wildlife, especially, these camera sounds can distract and scare the animals, which could ruin your shot.
  3. Camera RAW Setting
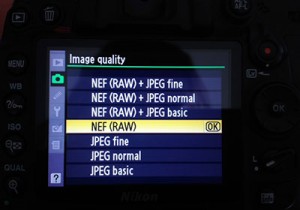
Set your file format – You should be shooting RAW files for the highest quality images with the most versatility for editing. Raw files can take longer to write to your memory cards, however, so if you are time bound, set it to high quality JPG mode.
  4. Format memory cards – Make sure your memory cards are formatted and ready for use. It helps to get into the habit of formatting your cards immediately after you’ve downloaded your images to ensure that they are ready for the next time you want to use them.
  5. Charge your batteries – Get into the habit of charging your batteries as soon as they get low to avoid a dead battery when you need your camera unexpectedly. There’s nothing worse than missing a shot because you are out of battery power.
  6. Clean your equipment – Clean your lenses, filters and camera sensors regularly to avoid unnecessary image editing later to remove dust and spots. Keep a lens cloth in your camera bag to clean your lenses on the go. Give your tripod a good wash and wipe down after you use it outside as well, to avoid damage or corrosion.
  7. Clean out your camera bag – To prevent getting dirt and dust in your camera and lenses, clean out your camera bag at least every few months.
  8. Pack Spare Essentials – Always carry a spare charged battery and extra memory cards in your camera bag. They don’t weigh much and it’s worth having them around if you need them.
  9. Bring a plastic garbage bag – Pack a plastic garbage bag in case of rain or as a ground cover if you have to get down in the dirt.
  10. Plan your shoot – Check a map before you head out, so you don’t waste time (and optimal light) looking for your location. Research the sun’s position ahead of time to ensure it doesn’t end up being behind a building or mountain at the time of your shoot. I use the Photographer’s Ephemeris, a handy app available for desktop and mobile devices that gives you sunrise and sunset times and directions, and lots of other information.
    Photographer's Ephemeris

What are some of the things you do to set up your camera and plan your photo shoots? Share in the comments below.

Stay tuned next week for 10 Exposure and Camera Setting Tips!

[Tweet “Improve your photography with 10 Camera Set-Up and Planning Tips. #photography #PhotoTips”]


Bali Dive Guide Featuring My Photos!

Bali DIVEmApps logo

Are you a scuba diver? Are you planning to dive in Bali? You need the Bali Dive Guide from DIVEmApps!

DIVEmApps recently released the Bali Dive Guide featuring photos from my travels in Bali! (Yay!)

The guide is built by divers for divers and gives you access to information about the most popular dive destinations and dive sites around Bali, Nusa Penida and Nusa Lembongan. Use the app to search dive sites, common fish and coral libraries. 

“The Bali Dive Guide by DIVEmApps is an indispensable tool for divers. It is an essential Dive Guide for anyone interested in diving Bali’s best sites. “
– Robert Scales, DIVEmApps’ Publisher

Plan your dives, explore new sites, check out the fish and coral sections, local emergency action plans, view detailed hand-crafted dive site maps created by experienced local guides and instructors, read the Mola and Manta codes of conduct, and learn about local conservation initiatives, review relevant fish signs and hand signals, and much more.

Bali Dive Guide Features:

  • Relevant information about Bali’s history, culture and point of interests
  • Pre dive information: Briefing, buddy check, hand signals, conservation, and code of conduct
  • Emergency Action Plan with local contacts
  • Searchable dives sites, fish and coral libraries
  • User friendly universal App (optimized for iOS 7, iPad Retina and iPhone 5)

My images are featured in the ‘About Bali’ section of the app:

In-App Purchase:

(Unlock all content on this DIVEmApps with a one-time payment $3.99) 

  • 30+ dive site descriptions with occasional tips, depth, and suggested experience level.
  • 30+ quality hand-drawn maps of some of the most popular dive sites around Bali, Nusa Lembongan, and Nusa Penida, Indonesia
  • 50+ common fish, coral, and invertebrates images and descriptions

The Bali Dive Guide is a great interactive tool for divers.

The Bali Dive Guide is available for FREE in the App Store.
* The Android version is expected to be released in June 2014.

Be sure to follow Bali Dive Guide on Facebook and Twitter for updates and other useful diving information.

For more photos from my travels in Bali, please visit my Flickr page

Have you used the Bali Dive Guide? What did you think?

Announcing the Olympic Spirit Project

As most of you know, I am working to get to Sochi in February to photograph the fan and cultural side of the 2014 Olympics. I launched a fundraising campaign a few weeks back, and have received a lot of feedback that this campaign did not really encompass my passions. I appreciate all of your honest feedback and have as a result created a new project that encompasses my passions for photography and the Olympics and is way more ME!

I’m very excited to share with you, “The Olympic Spirit Project.” – http://bit.ly/spirit2014

The Olympic Spirit Project on Kickstarter

Vancouver 2010 Men's Gold Medal Game

Vancouver 2010 Men's Gold Medal Hockey


What Is The Olympic Spirit Project?

I feel that with all the controversy surrounding the 2014 Olympic Games, the Olympic spirit has been somewhat lost. This is unfair to our Canadian athletes as well as their international competitors who have worked HARD to qualify for the biggest competition of their lives. They need our support! This project is geared at reviving the Olympic spirit and putting the attention back where it belongs: On the Athletes!

The goal of the Olympic Spirit Project is to capture images illustrating the Olympic Spirit through the eyes of different cultures from around the globe,  in Sochi during the 2014 Olympic Winter Games. I will share some of the images and stories with you from Russia on my blog, and after the Games are over the images will be edited and compiled into a book, which will then be available for sale. The targeted publishing date is September 2014.


Vancouver 2010 - Men's Team Pursuit Speed Skating Gold Medal Team
Vancouver 2010 – Men’s Team Pursuit Speed Skating Gold Medal Team


Vancouver 2010 - Paralympic Alpine Skiing
Vancouver 2010 – Paralympic Alpine Skiing


Vancouver 2010 - Paralympic Medal Ceremony
Vancouver 2010 – Paralympic Medal Ceremony
 

What’s in it for you?

In return for your support, I am offering rewards from a hand written postcard from Russia to the opportunity to experience an official Olympic event with me at the Games. All backers will be acknowledged in the final printed book.

All Levels: Thank-You Postcard from Russia – All backers pledging $10 or more will receive a hand-written Postcard sent from Russia during the Olympic Games.

All Levels: Your Name Featured in the Book – All backers pledging to the project will acknowledged on the Project Contributors page in the final printed book.

$25 Level: 5-pack of postcards featuring images from the project, and a digital copy of the finished book.

$85 Level: A digital copy of the finished book, a signed 5×7 print featuring an image from the project, and a 5-pack of postcards featuring images from the project.

$150 Level: A digital copy of the finished book, 2 signed 8×10 prints featuring images from the project, and a 5-pack of postcards featuring images from the project.

$350 Level: A hard cover copy of the finished book, 10 prints of photos taken of your personal pocket-sized mascot (provided by you) at 10 Russian Olympic landmarks.

$1000 Level: 2 signed hard cover copies if the finished book, a signed 11×14 print featuring an image from the project, 10 prints of photos taken of your personal pocket-sized mascot (provided by you) at 10 Russian Olympic landmarks.

$1500 Level (9 available): 2 signed hard cover copies of the finished book, a (used) official 2014 Olympic event ticket, a signed 11×14 print of an images from the project, 10 prints of photos taken of your personal pocket-sized mascot (provided by you) at 10 Russian Olympic landmarks. (there are

$2000 Level (1 available): A ticket to join me at the 2014 Olympic Men’s and Ladies’ Team Pursuit Speed Skating event on February 21st, 2014 in Sochi Russia (flight, accommodations and related travel expenses not included). You will also receive 2 signed hard cover copies of the finished book, and a signed 11×14 print of an image from the project.

$2000 Level (1 available): A ticket to join me at the 2014 Olympic Women’s Hockey Play-off Semi-Final Game on February 17th, 2014 in Sochi Russia (flight, accommodations and related travel expenses not included). You will also receive 2 signed hard cover copies of the finished book, and a signed 11×14 print of an image from the project.

$2000 Level (1 available): A ticket to join me at the 2014 Olympic Men’s Hockey Play-off Quarter-Final Game on February 19th, 2014 in Sochi Russia (flight, accommodations and related travel expenses not included). You will also receive 2 hard cover copies of the finished book, and a signed 11×14 print of an image from the project.

$2500 Level (1 available): A ticket to join me at the 2014 Olympic Bronze Medal Men’s Hockey Game on February 22nd, 2014 in Sochi Russia (flight, accommodations and related travel expenses not included). You will also receive 2 hard cover copies of the finished book, and a signed 11×14 print of an image from the project.

All Levels: Karma points and huge gratitude from me! : )

How You Can Help

With your support this project will come to life. Click the Kickstarter button below for full project details and for an opportunity to contribute to rebuilding the Olympic Spirit for our athletes in Sochi this coming February.

Pledge your support on Kickstarter

THANK YOU for your support!

How to Create a Fun Twist on a Family Portrait

Earlier this summer I was trying to come up with a fun idea as a 40th anniversary gift for our parents. Since they have everything, I thought a generational family portrait, including the grandchildren would be the perfect solution. So, my siblings and I have been working on this idea for the past month, coordinating secret photoshoots behind their backs, hehehe. The final photo turned out awesome and they absolutely LOVED it! We gave them the final print in the same frame that we are all holding in the photos.

40th Anniversary Family Photo

To create your generationally layered family photo, first take photos of each person holding the frame you will be using to put the final print in. You don’t need to include an image inside the frame, as you will add these with Photoshop later.

This is what the original images looked like:

Once you have all your photos taken and edited to your preference:

  1. Open Photoshop and create a path with the pen tool the inside of the frame on each image.
    For more info on how to use the pen tool, click here.
  2. Turn your path into a selection by clicking “Load path as a selection” on the Path palette. (If you do not see the Path Palette, go to the Window menu to turn it on.)
  3. Select the Select menu at the top of your Photoshop window and click Inverse to select everything OUTSIDE of the frame.
  4. Copy this selection, and then paste it right away into the same window.
  5. Paste the first photo into the first image BETWEEN the background layer and the new layer (Layer 1) that you just created.
  6. Use the Free Transform function (Edit menu > Free Transform) to manipulate the size and image location so that it fits perfectly into the framed area.
  7. Save the image as a jpeg.
  8. Repeat these steps and paste the new jpeg you just created into the next frame, until you have all your images.

If you have questions, or anything is unclear, please comment below, or send me a message and I’ll be happy to answer any questions.


A Side Trip to London and the 2012 Olympics

Earlier this summer I took a last minute, unexpected trip to the Netherlands for family reasons. It just so happened that it was timed perfectly with the 2012 Summer Olympics in London. So I thought to myself, “should I go to London?” The answer, of course, was, “hells yes, you should go to London!!” I was already most of the way there, and all that stood between me and experiencing that amazing Olympic energy again was a small puddle jump across the English Channel! I know I would have regretted it, had I not gone.

So upon a trusted recommendation, I navigated to the EasyJet website, one of Europe’s low cost airlines, and for about $200 CAD I booked my return ticket from Amsterdam to London Gatwick. From there I needed a train ticket to get into London proper. After a quick Google search I came upon the Gatwick Express site, and booked a ticket for about $45 CAD return, which went right to London’s Victoria station. Easy!

Finally, accommodations… I was very fortunate and thankful to the generosity of friends who were in London for the Games, and I was able to stay with them in the flat they had rented in Kensington. Awesome! I was set! On to London!!

As it was my first time in London, I spent a day exploring some of the well known landmarks and historical areas. I started in Hyde Park at Kensington Palace and slowly made my way, mostly on foot, to Big Ben and Westminster Abbey. The best part though (and thanks to James and Greg for giving me the ticket!), was the athletics event at the Olympic stadium! This was my first summer Olympics, so I was very excited about attending an official Olympic event! It was truly amazing to watch the athletic ability of the competitors! Their speed and talent was incredible to watch! I’m so grateful for having these two amazing friends who helped make it all happen for me!

I’d also like to send out a HUGE thank you to the Olympic Party Boys, James Mazur and Greg Mazur, for their generosity and hospitality that made my London adventure such an unforgettable experience! You guys are incredible and I’m so very grateful for your friendship and epic awesomeness! Big love to you both! 

LondonOlympics2012-39LondonOlympics2012-36LondonOlympics2012-12LondonOlympics2012-25

LondonOlympics2012-40

London2012London2012London2012London2012London2012London2012

For more travel images, please visit my Flickr page.