In the past few weeks we have covered camera setup and shoot planning, exposure and camera settings, and focusing and sharpness. Today I’ll be sharing some lighting and colour tips to help advance your photography skills even further.
10 Lighting and Colour Tips
- Take Advantage of Cloudy Days – You don’t need to wait for a sunny day to go out and shoot. Cloudy days are great for portraits, macro and even some landscape situations. The cloud provide a natural diffuser to the sun’s bright light and help eliminate harsh shadows.
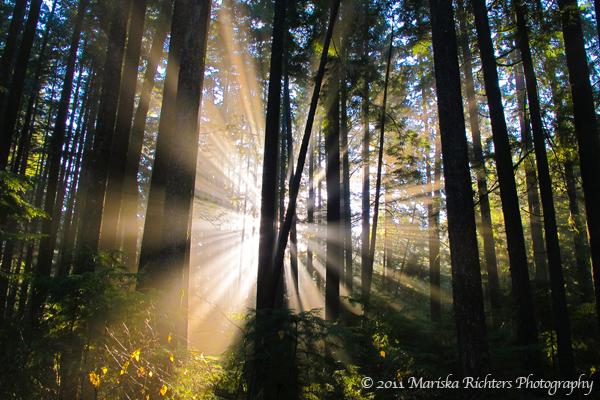
- Shoot Into the Light – Don’t always shoot with the sun behind you. Experiment with shooting into the light for some interesting images. Try to position the sun (or light source) behind your subject to help minimize flare.

Lynn Canyon, Vancouver, Canada – © 2011 Mariska Richters
- Shoot at the Golden Hour – The golden hour is one of my favourite times of day for shooting. The golden hour is the period shortly after sunrise or before sunset during which daylight is redder and softer compared to when the sun is higher in the sky. At these times the light is much warmer and you will get much better colour. You will also get some interesting shadows and textures.
- Use a Reflector – A reflector can help you fill in shadows by bouncing light back into the darker areas of your image. If you don’t have a proper reflector, you can use anything from a white piece of paper or poster board to a sheet of fabric like a t-shirt.
- Experiment With Fill-In Flash – Use your camera’s built-in or external flash to lighten shadows when the sunlight causes dark shadows on your subject.
[Tweet “Improve your photography with these Lighting and Colour Tips. #photography #PhotoTips”] - Use a Diffuser – The sun can produce some pretty harsh shadows when it’s high in the sky. Experiment with placing a diffuser between the light and the subject to soften shadows.You don’t have to spend big money on an expensive light diffuser, you can easily make one yourself out of a piece of white cloth or paper.
- Shoot at Night – Night photography is where I’ve produced some of my favourite images. Experiment using long exposures and other lighting techniques like light trails and painting with light. Be sure to bring a sturdy tripod and remote shutter release to help capture sharp images.

Granville Street, Vancouver, Canada – © 2010 Mariska Richters
- Play With Your White Balance – It’s easy to set your camera to automatic white balance, but the auto setting can be fooled in lighting some situations. If you’re shooting in a mixed lighting setting, try shooting a white or grey card and use this to help you learn about and set your custom white balance. Remember that as long as you are shooting in raw file format, you can always adjust the white balance with your software in post-production later.
- Shoot at Twilight – Just before sunrise and just after sunset are great for capturing some moody landscape images. It’s also a good time to catch street scenes and cityscapes while the sky has a bit of light yet you still capture the city lights.
- Try Shooting In Black and White – I’ve found that I don’t shoot much black and white since the emergence of digital photography. It was far easier to do when you used a roll of black and white film in your camera. But harsh sunlight can produce strong shadows for some interesting high-contrast back and white images. Try it!
Do you have any colour or lighting tricks to add? Share them in the comments below.
Next week I’ll share Composition and Creativity Tips.
If you found this article useful, please share it with your friends via the social media buttons below.