Home » Featured (page 6)

Featured

10 Must-Have Travel Apps For iPhone

I like to be organized when I travel to ensure I have a stress-free experience. Thankfully, there are some great travel apps for iPhone to help with this from planning a trip, to being on the ground at the destination, to connectivity with friends and family back home.

So without further ado, here are my 10 Must-Have Travel Apps for iPhone:
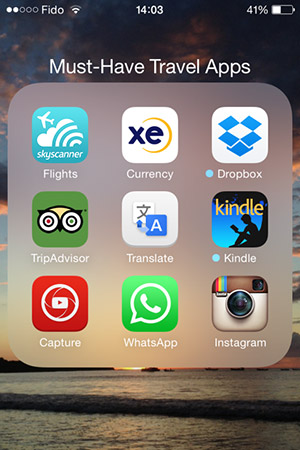
      • Must-Have Travel Apps for iPhoneSkyScanner SkyScanner aggregates fares from airlines and the big travel sites to find you the best deal. For the budget traveler, there’s also an option to pin your search to your start screen and keep an eye on price fluctuations.
      • XE Currency Use this free app for all your currency exchange needs while you’re on the road. XE Currency allows you to track multiple currencies at once and uses live currency rates so it’s always accurate.
      • Dropbox I use Dropbox to save all my flight, hotel and insurance information as well as any other travel related documents that I may need to access while on the road. I find this much more convenient and secure than carrying all that paper around with me. I also have my iPhone set up to back up my photos to Dropbox as soon as I connect to wi-fi. This allows for easy organizing, filtering and sharing photos from my laptop later.
      • Google Maps This is one of the most used apps on my iPhone both at home and when I travel to know where I am and where I’m going. If I know I won’t have wi-fi or mobile reception where I’m going, I simply take a screen shot of the map before I head out, just in case.
      • Trip Advisor Use Trip Advisor to check out brutally honest reviews from real people for accommodations, restaurants, activities and attractions. I’ve found this to be extremely useful in finding places that suit my wants and needs, and for avoiding places that are less than adequate. I also leave my own reviews on TripAdvisor from time to time, view my profile here.
        A secondary Trip Advisor app is the Offline City Guide, which pairs suggestions for where to visit, shop, and eat at your destination. Avoid the stress of finding a wi-fi connection by downloading offline maps for your destination. 
      • Google Translate This app was my saviour when traveling in Russia where I didn’t speak the language, nor could I read the alphabet. Simply type in what you want to say and the app will translate it to your language of choice both in text and sound through your iPhone’s speaker.
      • Kindle Don’t weigh down your luggage with books! Download your reading list for Kindle and read them on the iPhone or iPad.
      • YouTube Capture If you like instant upload gratification, use the YouTube Capture to get your travel videos uploaded to YouTube right away. You can record your video directly through the app, or upload videos from your library, edit, add music, a title and video description and then hit upload. Quick and easy! –> Subscribe to my YouTube channel!
      • Instagram If you’re like me, you take a ton of photos when you travel. Use Instagram to share your favourite photos with family, friends and followers. Customize your images using custom filter effects to create beautiful shareable photos. Instagram allows you to share your photos publicly, privately or send your pics directly to a specific user. –> Follow me on Instagram!
      • WhatsApp Messenger This cross-platform messaging app allows you to send messages, photos and video to your friends and family across the globe using wi-fi or your phones data package without any additional international texting charges.

What are some of your favourite travel apps? Please share below.

[Tweet “Simplify your travels with these 10 Must-Have Travel Apps For iPhone – #TravelTips #Apps”]


Photography: 10 Exposure and Camera Setting Tips

Last week’s I shared some tips about camera setup and shoot planning, this week I’ll be sharing tips about exposure and camera settings. There are some basic tips here as well as a few for more advanced photographers. I hope there’s something here you are able to learn from, and I’d love to hear any tips you might have to add in the comments below.

10 Exposure and Camera Setting Tips

  1. Exposure Bracketing – To ensure you get the shot, take two or more exposures at different shutter speeds. You can combine them later to adjust for high contrast images.
  2. Aperture Priority [A]- This setting lets you control the depth of field and then sets the appropriate shutter speed for your lighting situation. If you’re not familiar with how aperture works try taking a test shot with a wide aperture like f/4 to blur out the background, and then another of the same subject at f/16 and you’ll notice that more of the background is in focus.
  3. Camera Settings - Nikon D7000
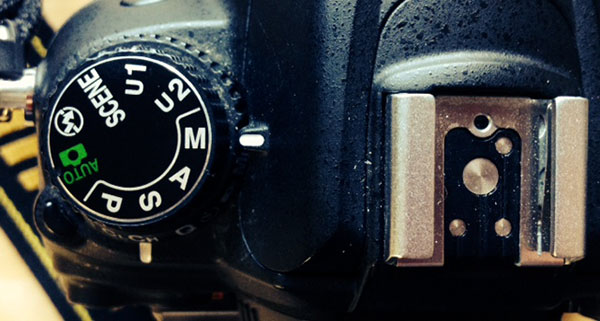
Shutter Priority [S] – Mastering this setting will allow you to control motion blur of your subjects. Try experimenting on a moving subject (I learned by sitting on the side of a busy street and shooting cars), shoot a few shots at 1/1000 sec to freeze your subject, and then try again at a much slower shutter speed like 1/15 sec to create some blur. Mastering this setting will open the door to creativity in your photography.
  4. Program Mode [P] – Many people write off program mode as an automatic point-and-shoot option, but if you don’t need a specific aperture or shutter speed, using Program frees you up to focus on composition and timing your shots.
  5. Manual Mode [M] – I use manual mode whenever I can as it gives the most control. Many cameras show you the expected result on the display, but I don’t shoot in live mode so I take a test shot and then adjust my settings as needed. You will need to have time to make any adjustments if you’re shooting in manual mode, so unless you’re super fast and intuitive with your settings, you may want to avoid manual mode for action shots.
  6. Use a Polarizer – My polarizer filter is one of my favourite accessories that I carry in my camera bag at all times. It allows you to reduce reflection as well as increase colour saturation. It also reduces light so it’s a great option for situations where you want to use longer shutter speeds or wide apertures in low light.
  7. Watch Your Display – When shooting in aperture or shutter priority modes, keep an eye on the in-camera display through the view finder. If it flashes Hi or Lo you will need to make an adjustment to your settings to ensure you get a sharp shot shot.Vancouver - False Creek
  8. Bulb Mode [B] – Use bulb mode for long exposures in low light, and make sure you use a tripod for sharp results. Bulb allows you to keep the shutter open for as long as you hold down the shutter release button. If you have a remote control for your camera, you can use it to control the shutter as well. Click once to open the shutter and click again to close it.
  9. Use and Understand the Histogram – The histogram display will give you information about your exposure. Large gaps to the far left or right indicate under or overexposure. You will gain even more information about your image exposure if you use the RGB histograms.
  10. Use a Tripod – I love night photography and long exposures, so my tripod is my best friend in those situations. Make sure you have a reliable tripod that is sturdy enough to hold the weight of your camera. I love my Jobi Gorillapod, but it’s not quite sturdy enough to safely hold my DSLR, so I use a heavier Manfrotto and save the Gorillapod for my Canon G12 point-and-shoot.

Do you have any tips to add? Please share them in the comments below.

Stay tuned next week for more photography tips, when I zero in on focusing and sharpness. 

[Tweet “Improve your photography: 10 Exposure and Camera Setting Tips. #Photography #PhotoTips”]

Wildlife: Vancouver Island Garter Snake

I ran into this Vancouver Island garter snake yesterday while watering the garden and managed to get quite close to take this video. He was actually quite curious and came to check out my iPhone while I took the video before slithering away.

About Garter Snakes

Most garter snakes have a pattern of yellow stripes on a brown or green background and their average length is about 55 cm, with a maximum length of about 137 cm. 

Garter snakes are very thin snakes. Most have longitudinal stripes in many different colours. They come in a wide range of colours including: green, blue, yellow, gold, red, orange, brown, and black. In summer, they are most active in the morning and late afternoon; in cooler seasons or climates, they restrict their activity to the warm afternoons.

The saliva of a garter snake may be toxic to amphibians and other small animals. For humans, a bite is not dangerous, though it may cause slight itching, burning, and/or swelling. Most garter snakes also secrete a foul-smelling fluid from postanal glands when handled or harmed. [source: Wikipedia]

This isn’t the first time I’ve run into a garter snake in my garden though, I saw another one (or maybe even the same one?) in the same spot just a few weeks ago and snapped this photo:

Vancouver Island Garter Snake

Have you ever been up close and personal with a snake? Please share your story in the comments below.


Olympic Spirit Project Postcards Are Here!

I’m so excited to announce that the Olympic Spirit Project postcards are now available in the online store! YAY!!! 

BUY NOW!

Why Are Olympic Spirit Project Postcards Awesome?

  • They are an original tangible souvenir from the Sochi 2014 Olympic Games, not a commercialized or virtual product that everyone else has.
  • People LOVE getting personalized mail! All most of us get these days is bills. Send an Olympic Spirit Project postcard to let someone know you’re thinking about them while supporting this inspiring ongoing project!
  • All photos were taken by yours truly in Sochi, Russia during the 2014 Olympic Games
  • They help keep Olympic Spirit alive between Olympic Games
  • Proceeds from postcard sales will go toward continuing the Olympic Spirit Project in Rio, Brazil in 2016 and beyond!

Cards Included in the Olympic Spirit Project Postcard Pack:

The 5-pack of postcards is available for only $17.95 while they last.

If you’re interested in purchasing individual cards or multiple copies of a single card, please contact me for pricing. Quantity discounts available.

BUY POSTCARDS

What’s Next?

The Olympic Spirit Project book is very close to being completed and sent off for publishing! I can’t wait to see the images in print and to share the final book and eBook with you! Stay tuned for updates!

Oh, and if your wondering where I get the cards printed, it’s through the super awesome MOO SHOP. <— Click this link for 10% off your very own MOO order!


Please Share the Olympic Spirit With a Tweet!

[Tweet “Check out these awesome #OlympicSpirit Project postcards! #Olympics #Sochi2014”]


Photography: 10 Camera Set-Up and Planning Tips

Summer presents us with some great photography opportunities with more light, longer days and clear summer skies. So with that in mind, I’m sharing some camera set-up and planning tips to help improve your photography skills not only for summer, but year round.

  1. Set your camera’s date, time and filename – Setting the date and time will help you organize your photos later when editing and will make them easier to find down the road if you’re looking for a particular photo. Set the filename to something you will find easily and can identify as your own images. I use my initials.
  2. Turn off camera sounds – Turning off the camera beeps makes shooting less intrusive. When shooting wildlife, especially, these camera sounds can distract and scare the animals, which could ruin your shot.
  3. Camera RAW Setting
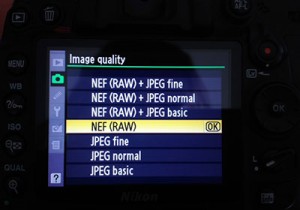
Set your file format – You should be shooting RAW files for the highest quality images with the most versatility for editing. Raw files can take longer to write to your memory cards, however, so if you are time bound, set it to high quality JPG mode.
  4. Format memory cards – Make sure your memory cards are formatted and ready for use. It helps to get into the habit of formatting your cards immediately after you’ve downloaded your images to ensure that they are ready for the next time you want to use them.
  5. Charge your batteries – Get into the habit of charging your batteries as soon as they get low to avoid a dead battery when you need your camera unexpectedly. There’s nothing worse than missing a shot because you are out of battery power.
  6. Clean your equipment – Clean your lenses, filters and camera sensors regularly to avoid unnecessary image editing later to remove dust and spots. Keep a lens cloth in your camera bag to clean your lenses on the go. Give your tripod a good wash and wipe down after you use it outside as well, to avoid damage or corrosion.
  7. Clean out your camera bag – To prevent getting dirt and dust in your camera and lenses, clean out your camera bag at least every few months.
  8. Pack Spare Essentials – Always carry a spare charged battery and extra memory cards in your camera bag. They don’t weigh much and it’s worth having them around if you need them.
  9. Bring a plastic garbage bag – Pack a plastic garbage bag in case of rain or as a ground cover if you have to get down in the dirt.
  10. Plan your shoot – Check a map before you head out, so you don’t waste time (and optimal light) looking for your location. Research the sun’s position ahead of time to ensure it doesn’t end up being behind a building or mountain at the time of your shoot. I use the Photographer’s Ephemeris, a handy app available for desktop and mobile devices that gives you sunrise and sunset times and directions, and lots of other information.
    Photographer's Ephemeris

What are some of the things you do to set up your camera and plan your photo shoots? Share in the comments below.

Stay tuned next week for 10 Exposure and Camera Setting Tips!

[Tweet “Improve your photography with 10 Camera Set-Up and Planning Tips. #photography #PhotoTips”]


Cocktail: How to Make a Snake Bite

It’s full on summer here in the Cowichan Valley, and that means that it’s time to pour some refreshing summertime cocktails! So today I’ll be sharing with you how to make a Snake Bite.

How to make a Snake Bite

Snake Bite Ingredients:
(makes 2 drinks)

  • Light Beer (preferably a lager)
  • Apple Cider  (my go-to is Strongbow)
  • Fresh lime slices
  • Ice (optional
  • You will also need 2 pint glasses

A Snake Bite is ridiculously easy to make: Half beer, half cider, done!

I got a bit adventurous with my ingredients today and went with a local summer ale from the Vancouver Island Brewery in Victoria, Canada, the Beachcomber Summer Ale. And for the cider today, I went with Fat Chance Cider from Vancouver, Canada.

[Tweet “Learn how to make a refreshing Snake Bite for those hot summer days. #cocktails #DrinkRecipe”]

How To Make A Snake Bite:

Mariska's Snake Bite Cocktail

  • Pour half a beer into each pint glass
  • Top off each glass with cider
  • Garnish each glass with a lime slice
  • Add a few ice cubes if it’s super hot out (optional)

BOOM! You’ve got yourself a Snake Bite!

Now plant your bum in a sunny spot and ENJOY! (Don’t forget to lube up with sunscreen!)

Cheers!

What are some of your favourite sunny summertime cocktails? Please share in the comments.


Community: Cumberland Community Forest Society

Last week I drove up to Cumberland, BC for the first time and I heard about the remarkable initiative of the Cumberland Community Forest Society.

The Cumberland Community Forest Society is a group of residents from the Cumberland community dedicated to preserving the forest around Cumberland from Comox Lake to Trent River. The forest in this area has many heritage landmarks and is rich with plants and wildlife and is well worth protecting.

The Forest of Cumberland

Since 2000, the Cumberland Community Forest Society has successfully raised over $1.2M and purchased more than 70 hectares of land. The Society has a mandate to raise another $1.2M by 2016 to purchase three more parcels of lush second growth forest to add 50 additional hectares to the protected area, which is scheduled to be logged in 2016.

Cumberland Community Forest Society Map

Orange: Proposed forest purchases. Light Green: Existing community forest. Dark Green: Coal Creek Heritage Park.

How to Contribute to the Cumberland Community Forest Society

The Society has supporters from all over the world, from international tourists to local mountain bikers who have enjoyed their time on the local trails to local Community Partners and major corporate Guardians like Mountain Equipment Co-op. For a full list of supporters, click here.

There are several options on ways to contribute from one-time donations to monthly contributions as low at $10 per month. I invite you to consider making a donation to help preserve this gorgeous piece of British Columbia and Vancouver Island.

  • Monthly contributions to the Cumberland Community Forest Society can be made by cheque or credit card.
  • One time donations are also accepted by cheque or credit card.
  • Become a Business Partner to the program by contacting the Society directly to discuss how your organization can help them achieve their goals. The Society offers a range of exciting recognition activities for Community Partners (up to $10,000), Legacy Donors ($10,000+) and Guardians ($50,000)

Having grown up on Vancouver Island, our natural forests are close to my heart. I commend the Vancouver Island community of Cumberland for taking the initiative to protect our beautiful forests. I look forward to exploring more of the area in the summer months and can’t wait to share that experience here.

Please consider making a donation to save the forest and the next time you’re on Vancouver Island, I encourage you to visit the beautiful Cumberland area so you can see for yourself that it’s worth preserving.

For more information and to make your donation to preserve the forest, please visit the Cumberland Community Forest Society website, and follow them on Twitter and Facebook for updates.

Have you visited the Cumberland forests? Please share your experience in the comments.


Day Trip: Botanical Beach on Vancouver Island

One of Vancouver Island’s truly unique beach experiences is Botanical Beach, near Port Renfrew in Juan de Fuca Provincial Park.

Botanical Beach is about a three-hour drive from either Victoria (via Sooke) or Nanaimo (via Lake Cowichan), so make sure you head out early to give yourself plenty of time to explore and enjoy the beach. It is a day-use area only, camping is not permitted on this beach. The best time to visit is at low tide, so you can walk out across the flat sandstone and granite beach to view tide pools filled with brightly coloured marine life.


Botanical Beach, BC - Map

Botanical Beach is one of the richest tidal areas on the Island’s west coast. You’ll find that the tidal pools are full of life, including mussels, snails, sea urchins, anemones, crabs, little fish, kelp and more. It’s a natural aquarium that will keep you busy for hours.

Botanical Beach on Vancouver Island

Tide Pool on Botanical Beach Tide Pool on Botanical Beach Tide Pool on Botanical Beach

There are also opportunities to view larger marine life. I’ve seen a pod of grey whales and orcas breaching off Botanical Beach on two separate occasions. Whales have feeding grounds just off Juan de Fuca Park. The best time to see Grey whales is during their migration from the Mexico to Alaska in March and April. Harbour seals and sea lions are also commonly found playing offshore from August to May. Keep your eyes peeled on the open water and you could get lucky.

Botanical Beach on Vancouver Island Botanical Beach on Vancouver Island

Tips for Visiting Botanical Beach

  • Look in the tide pools only – do not touch the marine life.
  • Do not remove, collect or disturb any tide pool life, shells, plants, flowers, kelp, etc. Even touching the water in a tide pool with sunscreen on your hands can create an “oil slick” that could kill the vulnerable creatures in this sensitive ecosystem.
  • Watch your step while exploring. The rocks can be very slippery and can be dangerously sharp.
  • Bring your camera. Photos make great souvenirs.
  • Wear sunscreen to protect yourself from the sun and bring a hat for additional protection.
  • Be sure to remove any valuables from your vehicle. Thieves are active in the area and it’s not uncommon to get back to your car to find that you’ve had an unwanted intrusion.
  • Watch for wildlife. Juan de Fuca Provincial Park is a wilderness area and there are black bears and cougars in the area. Be aware of your surroundings and if you happen to come across local wildlife, do not feed or approach it. Wildlife gets dangerous if they feel cornered or have young. Steer clear, even if it means you need to leave the beach for your own safety.
  • Bring binoculars in case you’re lucky enough to see whales playing off shore.
  • Pack a picnic. There are a couple of diner/cafe options in Port Renfrew, but there is nothing right on or near the beach. Pack a lunch with you if you plan to make it a full day trip.
  • Pack it in, pack it out. If you bring a picnic or a snack to the beach, make sure you pack out all your garbage and dispose of it responsibly. No one likes a litterbug, please keep our parks and beaches clean.
  • Stay for sunset. It’s absolutely beautiful!

Botanical Beach is a true gem on Vancouver Island’s west coast. It’s a must see and is one of my all time favourite day trips. For more information, please visit the BC Parks website.

What have you discovered in the tide pools at Botanical Beach?

Botanical Beach on Vancouver Island

[Tweet “Botanical Beach is a Vancouver Island gem. Check out these tips for a fun day trip. #ExploreBC “]

Cocktail: Tropical White Sangria

With summer around the corner I’m finding any excuse to hit the sun deck to soak up some vitamin D. So earlier this week I invited my girls to come over for a BBQ to test out a new tropical white sangria recipe.

It turned out so delicious, that I wanted to share. So without further ado…

Pitcher of White Sangria
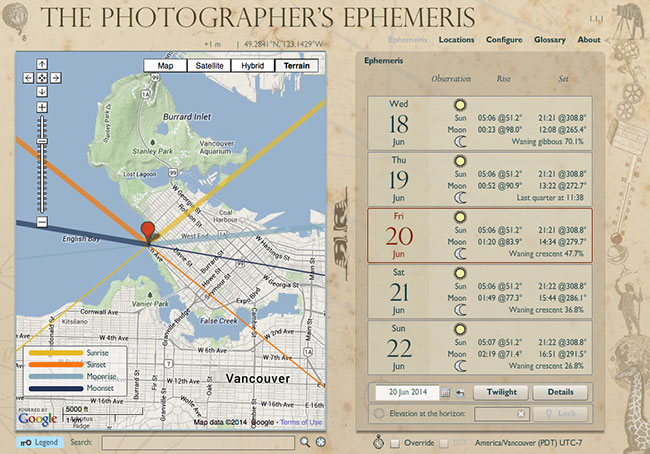
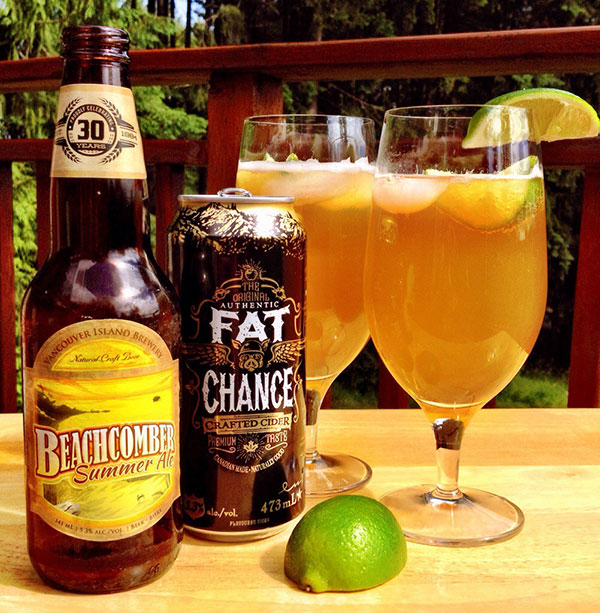
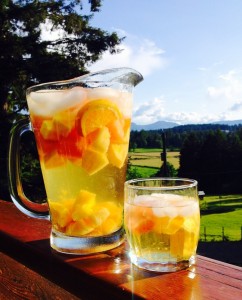
Tropical White Sangria Ingredients:

  • 1 bottle of moscato – I used Barefoot Moscato, only $9.99 at your BC Liquor Store
  • 1 cup of white rum
  • 1 can of club soda – since moscato is a very sweet wine, it’s not necessary to add a sugary soda like 7-up or ginger ale
  • 1 cup of pineapple juice
  • Tropical fruit chunks (bite-size) – I used fresh pineapple, fresh orange slices, fresh mango, and fresh watermelon
  • Top off the pitcher with ice

Combine all ingredients in a pitcher, stir with a wooden spoon, pour, sit in the sun, and enjoy! Cheers!

Do you have a favourite sangria recipe? I’d love for you to share it in the comments below.

Cheers! White Sangria

Cheers!

Maya Angelou (1928 – 2014)

There are countless inspiring Maya Angelou quotes. This one spoke to me this morning when I heard of her passing.

Rest in peace, Dr. Maya Angelou. Your life and words will continue to inspire far beyond your mortal days.

Maya Angelou - Dreams Quote
“A person is the product of their dreams. So make sure to dream great dreams. And then try to live your dreams.”
Maya Angelou
April 4, 1928 – May 28, 2014

Thursday, May 28, 2014

Statement from Dr. Maya Angelou’s Family:
“Dr. Maya Angelou passed quietly in her home before 8:00 a.m. EST. Her family is extremely grateful that her ascension was not belabored by a loss of acuity or comprehension. She lived a life as a teacher, activist, artist and human being. She was a warrior for equality, tolerance and peace. The family is extremely appreciative of the time we had with her and we know that she is looking down upon us with love.”
Guy B. Johnson

Source: Maya Angelou’s Facebook page.

What’s your favourite Maya Angelou quote? Please share in the comments.